
How to create a free website or blog
There are many options out there if you want to create your own website. But if you want customizability and still come away on the cheap the options shrink considerably. However if you create your website with something called a static site generator you'll be able to achieve exactly this. The only thing that you'll have to pay for in the end is the domain. (Though, to be fair if you don't mind ads you could use a dot.tk domain).
So let's get down to business.
Host your website
Your website needs to be hosted somewhere and the easiest and cheapest solution is by far to host it on Github. If you don't have an account there yet now is the time to create one!
Create a new repo and name it anything you like. The easiest way to manage this repo is through the git client that Github itself developed. So it would either be Github for Mac or Windows. If you're comfortable with git you already know what to do. If you are unfamiliar with git and would like to understand how it works I would recommend that you take a look at some videos.
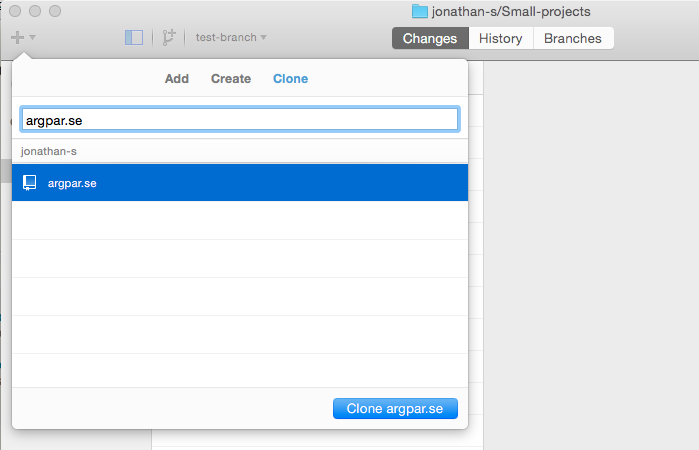
When you've downloaded the client you can choose to clone the repo that you already created onto your harddrive. That way you'll have a local copy of all the data in the repo which you can then push to remote repo at Github.
At the moment you only have blank folder, the next step is to set up the static site generator that will magically get your website up and running.
Installing Pelican, the software for your website
There are a couple of static site generators out there. One of them is Pelican which we will be using today. However, before you can install Pelican you'll need to have Python and Pip installed as well. You can find the instructions on how to get that installed for your OS right here. Generally I would recommend that you get python 3 installed. Python 2.7 works equally well though.
Now you've got all the requirements for installing Pelican. To install Pelican create a file named requirements.txt in the empty folder that you cloned from Github.
requirements.txt should contain the following:
markdown
git+https://github.com/getpelican/pelican.git
ghp-import
To get the installation started go to the commandline and into the directory with requirements.txt, then type in pip3 -r requirements.txt or pip -r requirements.txt if you have python 2.7 installed.
You should see the installation happening and once it's done you can install all the necessary files with the command pelican-quickstart. At this point you'll have to answer a couple of questions about your future website. This will generate some basic settings for your website. We will take a closer look at these settings further down.
I'm going to assume that you will answer yes to the question on generating a Fabfile/Makefile. I will also assume that you answer yes to wanting a an auto-reload script. I promise, it will make your life easier! After those two questions it will ask you questions about where you want to host your website. Keep answering no until until it asks you if you want tu use GitHub Pages. It will then ask you if you want to use your personal page and you should answer no to that. What you'll be using is called a project page.
Creating pages for your website with Pelican
After the inquisitive questions you've got more more files in your folder and it should looks something like this:
your website/
├── content
|   ├── (name_of_category)
│   └── (pages)
├── output
├── develop_server.sh
├── fabfile.py
├── Makefile
├── pelicanconf.py       # Main settings file
└── publishconf.py       # Settings to use when ready to publish
In the content folder you can now create a new file with the file extension your_blogpost.md. At the very top of the file you created you'll have some meta data about the the blog post. Which will look something like this.
Title: How to create a website
Date: 2015-05-17 16:00
Category: website
Tags: pelican, publishing
Slug: If-you-want-a-different-slug-than-title
Authors: Jonathan Sundqvist
Summary: Trying out pelican

This is your first post. If you generate this post without adding the right settings the image above won't show up. So continue to read! You can also link to another post like this: [another post]({filename}/category_folder/another_post.md)
That's all you need for a blog post. If you want your posts ordered in folders you'll have to make sure that category is set in the posts, as there is a setting that automatically uses folders as categories if no category is used in the post itself.
To add a page instead of just a blog post you'll place the markdown file in the pages folder. For a page the only two things you need is a "title" and "status" which can either be "published", "draft" or "hidden". If a page is hidden it's published but won't show up in any menus that pages normally show up in.
By default the url structure will be yoursite.com/pages/my-page. However you can change the url structure as you please as described in the example below.
Title: About me
Status: published
url: thispath/about-me
save_as: thispath/about-me/index.html
In fact once you've created these two pages. You can view what your website looks like locally. If you type in make devserver into the terminal. It will start to generate the website for you. Once that's done you can try to visit your website at the following address http://localhost:8000. That's what it will look like. Perhaps you want it to look differently? Then continue to read on and we will make those changes as well.
How to manage pelican's website settings
Now that you've installed pelican and run the command pelican-quickstart there are already two files used as settings in the folder for your website; pelicanconf.py and publishconf.py. This is where all the settings are stored. To quickly get up to speed I would suggest that you copy the settings that aren't the same from my github repository. That way you can customize the settings more quickly.
Now that you've copied the settings. Let's take a closer look at what some of them do. pelicanconf.py is where you set the base settings. Any settings that needs to be different when publishing should be set in publishconf.py. It
SLUGIFY_SOURCE- This is what input it will use to create a slug, that is, a url-friendly link. It makes most sense to leave it as title.WITH_FUTURE_DATES- If let this option be "False" it won't publish posts that are still in the future. This way you can schedule posts.PATH- This is the folder where all your pages or blog posts in markdown will be as well as any extra folders that you want to end up on the website.THEME- This is the name of the theme you will be using. When you've just pelican you'll only have one theme. There are more themes to download . Once you've downloaded a theme you can install it with the following commandpelican-themes -s path/to/themefolder. You can then verify that it's installed withpelican-themes -l.STATIC_PATHS- Here you can create folders that will be created as urls for the website.EXTRA_PATH_METADATA- If you don't want the files in the static path to have a different path you can change that here. And follow the structure in my pelicanconf.py*_URLand*_SAVE_AS- these define the url structure of your website for your pages and posts and they have to correlate with each other. So if you want the url of an article to beposts/{category}/{slug}you'll also have to save asposts/{category}
These should be the most important ones. There are other settings that you can read about in the manual .
Getting the website live and creating a domain
Now that you've gotten everything set up the way you want it's time to get the website live. After you've made sure that everything looks good in the browser using make devserver we can take the step to get it live on internet.
You can do that with the simple command make github and that will generate the website and publish all the html files in the repo that you created earlier.
Now you can go to http://your-username.github.io/your-repo and view your website. It's live!
The last step of this tutorial will be to create a domain for your website. I'm going to use Gandi. They have a huge selection of domains, they don't collect your data if you don't want them to and generally they have good attitude. So they are definitely a good option!
Once you have created your domain you'll have to make changes to the what Gandi calls the 'Zone file'. It will look like the image below.
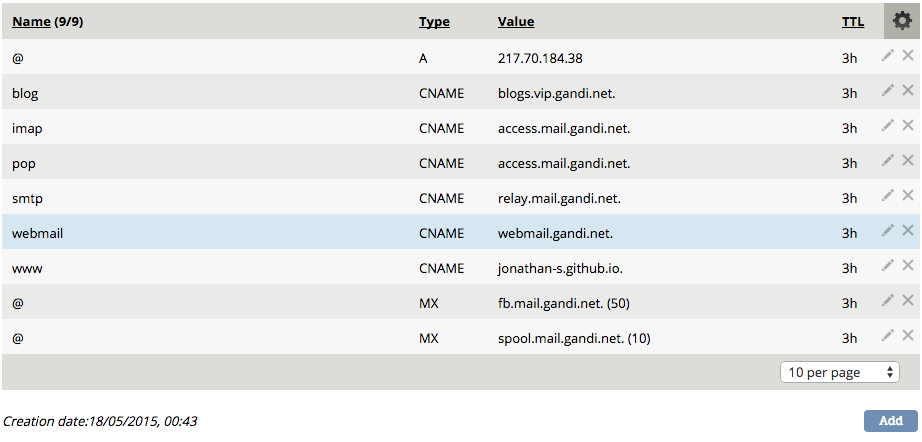
Create a new version of the Zone file and add a new record. The type you should use when you add a new record is CNAME. The name has to be www. So in the end the address would be www.your-domain.com to your website. The value on the other hand should be your-username.github.io.. It's important that you have that last dot, otherwise it won't work. After you've added the record, start using the zone file that you just modified. It will take a couple of hours before the changes apply to the domain.
While you are waiting you can make one final change to the settings of your website. Create a new folder called extra in your content folder where you have all your files. In this new folder create a file named CNAME with capital letters. In this file write a single line with your domain. It should look something like this: www.your-domain.com. The last thing you need to do is to add this line: 'extra/CNAME': {'path': 'CNAME'} to EXTRA_PATH_METADATA in pelicanconf.py. Execute make github in the terminal to upload the changes to github again and you're good to go.
When you next visit your domain you should now see your website! Congratulations, you now have your own website! If you have any questions. Ask away!
Thanks for reading! If you need anyone to solve technical problems or build web applications in Django, send me an email and let's talk.
If you're interested in getting the latest blog posts directly to your inbox you can subscribe below.